Học Arduino_Dự án 67: Chế tạo một thiết bị đo khoảng cách và diện tích dùng cảm biến siêu âm HC-SR04
- 03/07/2018
- Tự học
Trong dự án này bạn sẽ
Đây là thiết bị dùng 1 cảm biến siêu âm để đo khoảng cách tới vật gần nhất và góc phương vị của chúng so với mặt đất. Thiết bị thu nhận thông tin và hiển thị chúng lên màn hình LCD tất cả các thông số. Các thành phần trong bộ thiết bị có thể được kết nối bằng mạch in PCB,hoặc một bộ khung.
Thiết bị được vận hành bởi 1 nút nhấn để có thể chọn đơn vị đo lường thích hợp,kèm theo đó là công tắc để bật và mở nguồn. Để chọn chế độ trong thiết bị ta chỉ cần nhấn và giữ nút nhấn trong 1 thời gian cho đến khi chúng có được chế độ thích hợp,cụ thể là chế độ cho phép đo đầu tiên,ngoài ra,ta cũng có thể lưu lại thông số của phép đo đầu tiên này.
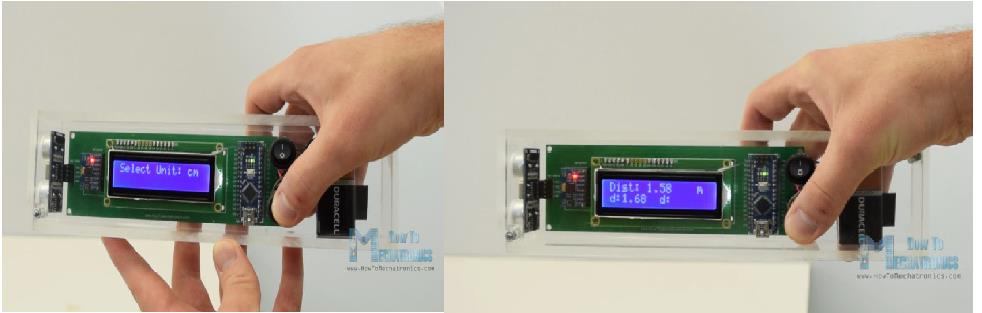
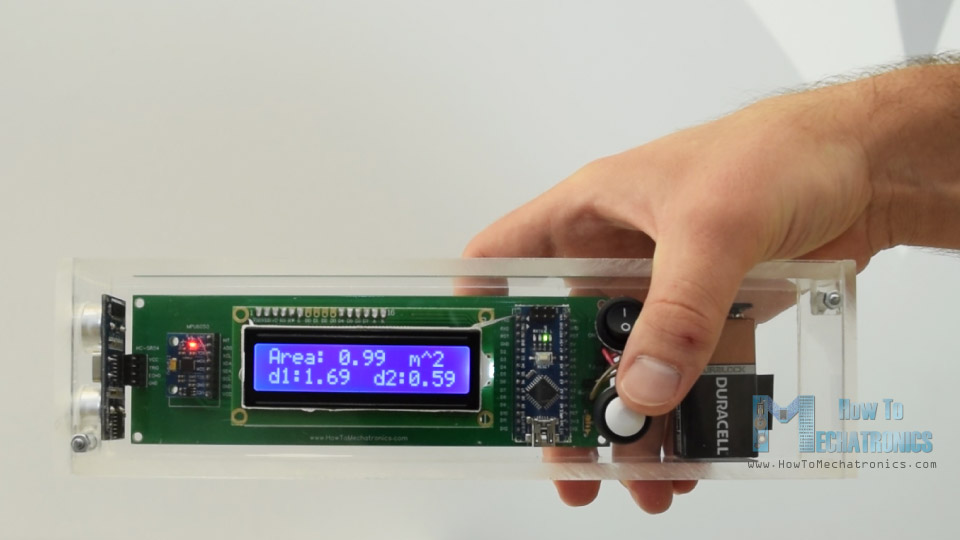
Muốn chọn chế độ đo thứ hai là đo diện tích,ta chỉ cần nhấn và giữ nút nhấn 1 lần nữa cho đến khi màn hình LCD hiện lên các thông số thích hợp. Ở chế độ này,ta có thể đo được diện tích băng cách lấy vuông góc giữa hai phép đo khoảng cách trong 1 khu vực.
Chế độ đo tiếp theo mà ta có thể cho chính là một thiết bị đo nghiêng kĩ thuật số. Như trên,ta chỉ cần nhấn và giữ đến khi màn hình hiển thị các thông số mong muốn. Ở chế độ này,ta có thể đo góc nghiêng của mặt phẳng so với mặt đất. Sau khi chọn được chế độ,ta sẽ dùng nút nhấn để chọn phép đo góc với trục x và y tương ứng,hoặc giữa trục x và y.
Sơ đồ kết nối
Dưới đây là sơ đồ mạch của cả dự án
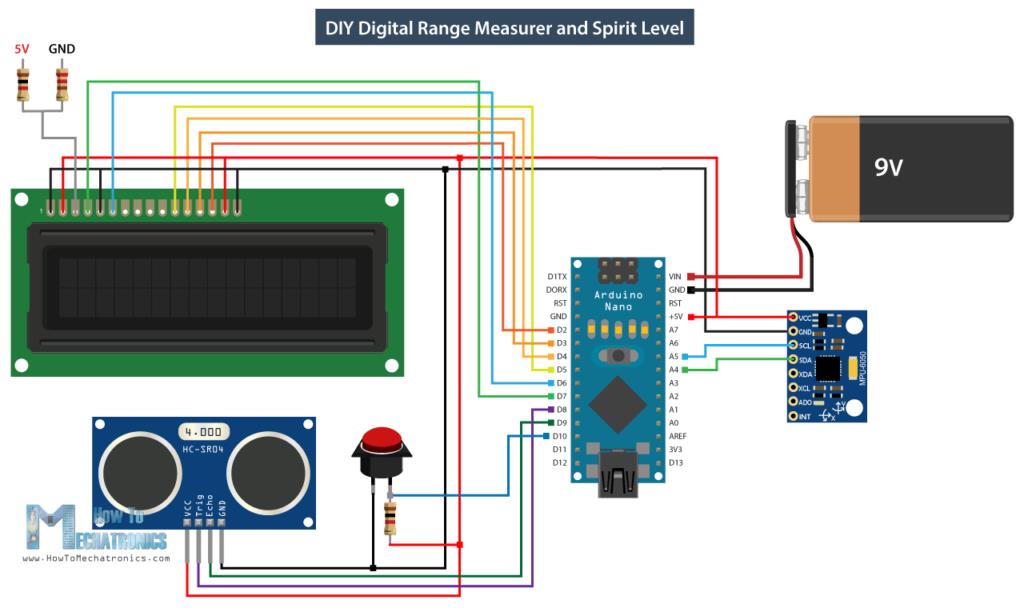
Thay vì sử dụng 1 board Arduino UNO R3 cồng kềnh,ta sẽ dùng ardunino NANO nhỏ gọn hơn để thay thế,nhưng cũng với đầy dủ những chức năng. Ngoài ra ,nếu bạn đã có sẵn 1 board Uno R3 thì hãy cứ sử dụng và nhất thiết phải chọn đúng chân kết nối cũng như khai báo đúng chân khi lập trình.
Tất cả các thành phần của dự án,ta điều có thể tìm thấy hầu hết trong bộ KIT Arduino bán trên thị trường hay từng linh kiện riêng lẻ trong hầu hết những cửa hàng linh kiện.
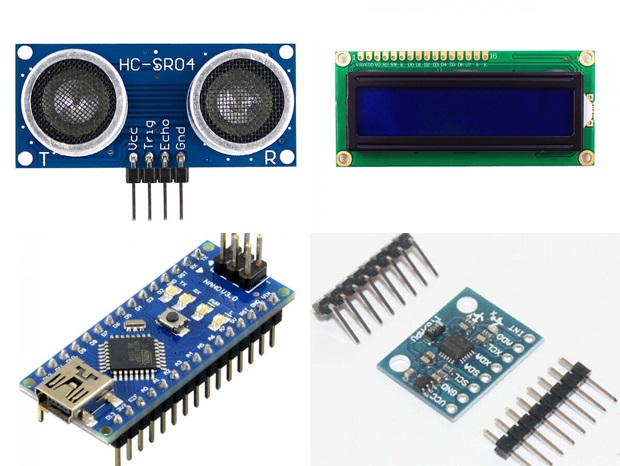
Từ trên xuống theo chiều kim đồng hồ lần lượt là cảm biến siêu âm HC-SR04,màn hình LCD 16X2, cảm biến gia tốc MPU6050 , board Arduino Nano. Đây là tất cả các thành phần cơ bản có trong dự án.
code điều khiển
Đầu tiên ta cần có thư viện Wire.h dành cho giao tiếp I2C giữa board Arduino Nano và bộ đo gia tốc cùng với đó là LiquidCrystal.h dùng trong việc điều khiển màn hình LCD. Sau đó ta cần phải xác định địa chỉ I2C của modul đo gia tốc,màn hình LCD và các chân cảm biến siêu âm kèm theo đó là một số biến cần thiết cho chương trình.
#include<Wire.h> // I2C communication library
#include <LiquidCrystal.h> // includes the LiquidCrystal Library
LiquidCrystal lcd(7, 6, 5, 4, 3, 2); // Creates an LCD object. Parameters: (rs, enable, d4, d5, d6, d7)
const int MPU = 0x68; // I2C address of the MPU6050 accelerometer
#define trigPin 8
#define echoPin 9
#define selectButton 10
int16_t AcX, AcY, AcZ;
long duration;
float distance;
int program = 0;
float d = 0;
float d1 = 0;
float d2 = 0;
float area = 0;
int axis = 0;
int angle = 0;
int unitSelect = 0;
String unit = “cm”;
Tiếp theo ta cần khởi tạo giao diện trên màn hình LCD các thông số thông qua giao tiếp của gia tốc kế và cảm biến siêu âm.
void setup()
{
// Initialize interface to the MPU6050
Wire.begin(); Wire.beginTransmission(MPU);
Wire.write(0x6B); Wire.write(0);
Wire.endTransmission(true);
lcd.begin(16, 2); // Initializes the interface to the LCD screen
pinMode(trigPin, OUTPUT);
pinMode(echoPin, INPUT);
pinMode(selectButton, INPUT_PULLUP);
}
Trong phần này,ta sẽ viết chương trình để tạo nên các chế độ đo khác nhau cũng như sự chuyển tiếp giữa chúng. Đầu tiên khi chọn số 0 ta sẽ chọn được đơn vị đo lường,sau đó là 1,2,3 đến các đơn vị khác. Hàm lcd.print () đưa thông số lên màn hình LCD,qua câu lệnh if ta sẽ có thể chọn lần lượt 4 đơn vị đó.
switch (program) { // Switch between different programs
case 0: // Select unit of measurement
lcd.setCursor(0, 0); // Sets the location at which subsequent text written to the LCD will be displayed
lcd.print(“Select Unit: “);
lcd.setCursor(13, 0);
lcd.print(unit);
lcd.print(” “);
delay(10);
// If button is pressed – change unit
if (digitalRead(selectButton) == 0) {
if (unitSelect == 0) {
unit = “in”;
unitSelect = 1;
}
else if (unitSelect == 1) {
unit = “m”;
unitSelect = 2;
}
else if (unitSelect == 2) {
unit = “ft”;
unitSelect = 3;
}
else if (unitSelect == 3) {
unit = “cm”;
unitSelect = 0;
}
// If button is held longer then half a second – change program
delay(500);
if (digitalRead(selectButton) == 0) {
program = 1;
lcd.clear();
delay(500);
}
}
break;
biến unitSelect sẽ có một số chức năng nhất định trong hàm getDistance () cunstom nơi mà nó sẽ chuyển đổi đơn vị cơ bản từ cm theo các thông số thu nhận được từ cảm biến siêu âm.
/ Converting the units
  if (unitSelect == 1) {
    distance = distance; // cm to cm
    unit = "cm";
  }
  else if (unitSelect == 2) {
    distance = distance *  0.393701; // cm to in
    unit = "in";
  }
  else if (unitSelect == 3) {
    distance = distance * 0.01; // cm to m
    unit = "m";
  }
  else if (unitSelect == 0) {
    distance = distance * 0.0328; // cm to ft
    unit = "ft";
  }
Khi lựa cho chế độ đo lường cho thiết bị ta chỉ cần nhấn nút nhấn dài hơn nửa giây
// If button is held longer then half a second - change program
        delay(500);
        if (digitalRead(selectButton) == 0) {
          program = 1;
          lcd.clear();
          delay(500);
        }
      }
      break;
trong case 1 hay còn được xem là chế độ đo khoảng cách đầu tiên ,khoảng các gần nhất được xác định bằng hàm Distance() custom
case 1:   // Distance measuring program
      distance = getDistance(); // Distance to the nearest object
      lcd.setCursor(0, 0);
      lcd.print("Dist: ");
      lcd.print(distance); // Prints the distance value from the sensor
      lcd.print("    ");
      lcd.setCursor(14, 0);
      lcd.print(unit);
      delay(10);
      lcd.setCursor(0, 1);
      lcd.print("d:");
      lcd.setCursor(8, 1);
      lcd.print("d:");
      delay(200);
      // Save distance 1
      if (digitalRead(selectButton) == 0) {
        if (d == 0) {
          lcd.setCursor(0, 1);
          lcd.print("d:     ");
          lcd.setCursor(2, 1);
          lcd.print(distance);
          d = 1;
          delay(100);
        }
        // Save distance 2
        else if (d == 1) {
          lcd.setCursor(8, 1);
          lcd.print("d:     ");
          lcd.setCursor(10, 1);
          lcd.print(distance);
          d = 0;
          delay(100);
        }
        // If button is held longer then half sencond change program
        delay(500);
        if (digitalRead(selectButton) == 0) {
          program = 2;
          d = 0;
          lcd.clear();
          delay(500);
        }
      }
      break;
//===== getDistance - Custom Function
float getDistance() {
  // Clears the trigPin
  digitalWrite(trigPin, LOW);
  // Sets the trigPin on HIGH state for 10 micro seconds
  digitalWrite(trigPin, HIGH);
  delayMicroseconds(10);
  digitalWrite(trigPin, LOW);
  // Reads the echoPin, returns the sound wave travel time in microseconds
  duration = pulseIn(echoPin, HIGH);
  // Calculating the distance
  distance = duration * 0.034 / 2; // distance in cm

  // Converting the units
  if (unitSelect == 1) {
    distance = distance; // cm to cm
    unit = "cm";
  }
  else if (unitSelect == 2) {
    distance = distance *  0.393701; // cm to in
    unit = "in";
  }
  else if (unitSelect == 3) {
    distance = distance * 0.01; // cm to m
    unit = "m";
  }
  else if (unitSelect == 0) {
    distance = distance * 0.0328; // cm to ft
    unit = "ft";
  }
  return distance;
}
Ta sẽ sử dụng chân trigger để kích hoạt để tạo ra tín hiệu từ cảm biến siêu âm. Sau đó ta sử dụng hàm pulseIn () để đo thời lượng phản hồi của sóng âm từ vật cản đến thiết bị,qua việc tính toán tốc độ của sóng âm và thời gian phản hồi mà ta có thể xác định được khoảng cách từ vận cản đến thiết bị đo. Lệnh if được thiết kế để khi nhấn nút có thể lưu kết quả của phép đo cuối cùng, tất cả thông số điều được hiển thị trên màn hình LCD.
case 2:   // Area measuring program
      distance = getDistance();
      lcd.setCursor(0, 0);
      lcd.print("Area: ");
      lcd.print(area); // Prints the calculated area from the two measurements
      lcd.setCursor(12, 0);
      lcd.print(unit); // Prints the selected unit and the square sign below
      lcd.print("^2");
      delay(200);
      if ( d == 0) {
        lcd.setCursor(0, 1);
        lcd.print("d1:       ");
        lcd.setCursor(3, 1);
        lcd.print(distance);
        delay(200);
      }
      else if (d == 1) {
        lcd.setCursor(9, 1);
        lcd.print("d2:      ");
        lcd.setCursor(12, 1);
        lcd.print(distance);
        delay(200);
      }
      else if (d == 2) {
        lcd.setCursor(6, 0);
        lcd.print(area);
        delay(200);
      }
      // Save distance 1
      if (digitalRead(selectButton) == 0) {
        if (d == 0) {
          lcd.setCursor(0, 1);
          lcd.print("d1:    ");
          lcd.setCursor(3, 1);
          lcd.print(distance);
          d = 1;
          d1 = distance;
          delay(100);
        }
        // Save distance 2
        else if (d == 1) {
          lcd.setCursor(9, 1);
          lcd.print("d2:    ");
          lcd.setCursor(12, 1);
          lcd.print(distance);
          d = 2;
          d2 = distance;
          area = d1 * d2; // Calculate the area
          delay(100);
        }
        else if (d == 2) {
          lcd.clear();
          d = 0;
          area = 0;
          delay(100);
        }
        // If button is held longer then half sencond change program
        delay(500);
        if (digitalRead(selectButton) == 0) {
          program = 3;
          d = 0;
          lcd.clear();
          delay(500);
        }
      }
      break;
Chế độ cuối cùng chính là đo góc nghiêng so với phương ngang. Ở đây ta cần đôc dữ liệu về gia tốc trọng trường của trái đất ở 3 trục X,Y,Z thông qua dữ liệu từ máy đo gia tốc . Giá trị của mỗi trục được lưu trong 2 thanh ghi cho nên ta cần 6 trục để có thể đọc kết quả.
case 3:    // Angle measuring program
      // Read the accelerometer data
      Wire.beginTransmission(MPU);
      Wire.write(0x3B); // Start with register 0x3B (ACCEL_XOUT_H)
      Wire.endTransmission(false);
      Wire.requestFrom(MPU, 6, true); // Read 6 registers total, each axis value is stored in 2 registers
      AcX = Wire.read() << 8 | Wire.read(); // X-axis value
      AcY = Wire.read() << 8 | Wire.read(); // Y-axis value
      AcZ = Wire.read() << 8 | Wire.read(); // Z-axis value

      if ( axis == 0) {
        // Calculating the Pitch angle (rotation around Y-axis)
        angle = atan(-1 * AcX / sqrt(pow(AcY, 2) + pow(AcZ, 2))) * 180 / PI;
        lcd.setCursor(0, 0);
        lcd.print("Pitch");
      }
      else if (axis == 1) {
        // Calculating the Roll angle (rotation around X-axis)
        angle = atan(-1 * AcY / sqrt(pow(AcX, 2) + pow(AcZ, 2))) * 180 / PI;
        lcd.setCursor(0, 0);
        lcd.print("Roll ");
      }
      lcd.setCursor(0, 1);
      lcd.print("Angle: ");
      lcd.print(abs(angle));
      lcd.print("     ");
      lcd.setCursor(10, 1);
      lcd.print("deg");
      delay(200);

      // Change axis
      if (digitalRead(selectButton) == 0) {
        if (axis == 0) {
          axis = 1;
          delay(100);
        }
        // Save distance 2
        else if (axis == 1) {
          axis = 0;
          delay(100);
        }
        // If button is held longer then half sencond change program
        delay(500);
        if (digitalRead(selectButton) == 0) {
          program = 0;
          lcd.clear();
          delay(500);
        }
      }
      break;
Khi có được thông số từ cảm biến đo gia tốc ta sẽ xác định được góc phương vị so với trục X và Y.
/*
  DIY Digital Range Measurer and Spirit Level

  by Dejan Nedelkovski,
  www.HowToMechatronics.com

*/
#include<Wire.h> // I2C communication library
#include <LiquidCrystal.h> // includes the LiquidCrystal Library

LiquidCrystal lcd(7, 6, 5, 4, 3, 2); // Creates an LCD object. Parameters: (rs, enable, d4, d5, d6, d7)
const int MPU = 0x68; // I2C address of the MPU6050 accelerometer

#define trigPin 8
#define echoPin 9
#define selectButton 10

int16_t AcX, AcY, AcZ;
long duration;
float distance;
int program = 0;
float d = 0;
float d1 = 0;
float d2 = 0;
float area = 0;
int axis = 0;
int angle = 0;
int unitSelect = 0;
String unit = "cm";

void setup() {
  // Initialize interface to the MPU6050
  Wire.begin();
  Wire.beginTransmission(MPU);
  Wire.write(0x6B);
  Wire.write(0);
  Wire.endTransmission(true);

  lcd.begin(16, 2); // Initializes the interface to the LCD screen

  pinMode(trigPin, OUTPUT);
  pinMode(echoPin, INPUT);
  pinMode(selectButton, INPUT_PULLUP);
}
void loop() {
  switch (program) {  // Switch between different programs
    case 0:  // Select unit of measurement
      lcd.setCursor(0, 0); // Sets the location at which subsequent text written to the LCD will be displayed
      lcd.print("Select Unit: ");
      lcd.setCursor(13, 0);
      lcd.print(unit);
      lcd.print("  ");
      delay(10);
      // If button is pressed - change unit
      if (digitalRead(selectButton) == 0) {
        if (unitSelect == 0) {
          unit = "in";
          unitSelect = 1;
        }
        else if (unitSelect == 1) {
          unit = "m";
          unitSelect = 2;
        }
        else if (unitSelect == 2) {
          unit = "ft";
          unitSelect = 3;
        }
        else if (unitSelect == 3) {
          unit = "cm";
          unitSelect = 0;
        }
        // If button is held longer then half a second - change program
        delay(500);
        if (digitalRead(selectButton) == 0) {
          program = 1;
          lcd.clear();
          delay(500);
        }
      }
      break;

    case 1:   // Distance measuring program
      distance = getDistance(); // Distance to the nearest object
      lcd.setCursor(0, 0);
      lcd.print("Dist: ");
      lcd.print(distance); // Prints the distance value from the sensor
      lcd.print("    ");
      lcd.setCursor(14, 0);
      lcd.print(unit);
      delay(10);
      lcd.setCursor(0, 1);
      lcd.print("d:");
      lcd.setCursor(8, 1);
      lcd.print("d:");
      delay(200);
      // Save distance 1
      if (digitalRead(selectButton) == 0) {
        if (d == 0) {
          lcd.setCursor(0, 1);
          lcd.print("d:     ");
          lcd.setCursor(2, 1);
          lcd.print(distance);
          d = 1;
          delay(100);
        }
        // Save distance 2
        else if (d == 1) {
          lcd.setCursor(8, 1);
          lcd.print("d:     ");
          lcd.setCursor(10, 1);
          lcd.print(distance);
          d = 0;
          delay(100);
        }
        // If button is held longer then half sencond change program
        delay(500);
        if (digitalRead(selectButton) == 0) {
          program = 2;
          d = 0;
          lcd.clear();
          delay(500);
        }
      }
      break;

    case 2:   // Area measuring program
      distance = getDistance();
      lcd.setCursor(0, 0);
      lcd.print("Area: ");
      lcd.print(area); // Prints the calculated area from the two measurements
      lcd.setCursor(12, 0);
      lcd.print(unit); // Prints the selected unit and the square sign below
      lcd.print("^2");
      delay(200);
      if ( d == 0) {
        lcd.setCursor(0, 1);
        lcd.print("d1:       ");
        lcd.setCursor(3, 1);
        lcd.print(distance);
        delay(200);
      }
      else if (d == 1) {
        lcd.setCursor(9, 1);
        lcd.print("d2:      ");
        lcd.setCursor(12, 1);
        lcd.print(distance);
        delay(200);
      }
      else if (d == 2) {
        lcd.setCursor(6, 0);
        lcd.print(area);
        delay(200);
      }
      // Save distance 1
      if (digitalRead(selectButton) == 0) {
        if (d == 0) {
          lcd.setCursor(0, 1);
          lcd.print("d1:    ");
          lcd.setCursor(3, 1);
          lcd.print(distance);
          d = 1;
          d1 = distance;
          delay(100);
        }
        // Save distance 2
        else if (d == 1) {
          lcd.setCursor(9, 1);
          lcd.print("d2:    ");
          lcd.setCursor(12, 1);
          lcd.print(distance);
          d = 2;
          d2 = distance;
          area = d1 * d2; // Calculate the area
          delay(100);
        }
        else if (d == 2) {
          lcd.clear();
          d = 0;
          area = 0;
          delay(100);
        }
        // If button is held longer then half sencond change program
        delay(500);
        if (digitalRead(selectButton) == 0) {
          program = 3;
          d = 0;
          lcd.clear();
          delay(500);
        }
      }
      break;

    case 3:    // Angle measuring program
      // Read the accelerometer data
      Wire.beginTransmission(MPU);
      Wire.write(0x3B); // Start with register 0x3B (ACCEL_XOUT_H)
      Wire.endTransmission(false);
      Wire.requestFrom(MPU, 6, true); // Read 6 registers total, each axis value is stored in 2 registers
      AcX = Wire.read() << 8 | Wire.read(); // X-axis value
      AcY = Wire.read() << 8 | Wire.read(); // Y-axis value
      AcZ = Wire.read() << 8 | Wire.read(); // Z-axis value

      if ( axis == 0) {
        // Calculating the Pitch angle (rotation around Y-axis)
        angle = atan(-1 * AcX / sqrt(pow(AcY, 2) + pow(AcZ, 2))) * 180 / PI;
        lcd.setCursor(0, 0);
        lcd.print("Pitch");
      }
      else if (axis == 1) {
        // Calculating the Roll angle (rotation around X-axis)
        angle = atan(-1 * AcY / sqrt(pow(AcX, 2) + pow(AcZ, 2))) * 180 / PI;
        lcd.setCursor(0, 0);
        lcd.print("Roll ");
      }
      lcd.setCursor(0, 1);
      lcd.print("Angle: ");
      lcd.print(abs(angle));
      lcd.print("     ");
      lcd.setCursor(10, 1);
      lcd.print("deg");
      delay(200);

      // Change axis
      if (digitalRead(selectButton) == 0) {
        if (axis == 0) {
          axis = 1;
          delay(100);
        }
        // Save distance 2
        else if (axis == 1) {
          axis = 0;
          delay(100);
        }
        // If button is held longer then half sencond change program
        delay(500);
        if (digitalRead(selectButton) == 0) {
          program = 0;
          lcd.clear();
          delay(500);
        }
      }
      break;
  }
}

//===== getDistance - Custom Function
float getDistance() {
  // Clears the trigPin
  digitalWrite(trigPin, LOW);
  // Sets the trigPin on HIGH state for 10 micro seconds
  digitalWrite(trigPin, HIGH);
  delayMicroseconds(10);
  digitalWrite(trigPin, LOW);
  // Reads the echoPin, returns the sound wave travel time in microseconds
  duration = pulseIn(echoPin, HIGH);
  // Calculating the distance
  distance = duration * 0.034 / 2; // distance in cm

  // Converting the units
  if (unitSelect == 1) {
    distance = distance; // cm to cm
    unit = "cm";
  }
  else if (unitSelect == 2) {
    distance = distance *  0.393701; // cm to in
    unit = "in";
  }
  else if (unitSelect == 3) {
    distance = distance * 0.01; // cm to m
    unit = "m";
  }
  else if (unitSelect == 0) {
    distance = distance * 0.0328; // cm to ft
    unit = "ft";
  }
  return distance;
}
nguồn tham khảo

https://howtomechatronics.com/arduino-projects/
Sản phẩm được quan tâm
Nhận bài viết mới
Các bài viết chia sẻ đến cộng đồng rất chât lượng, mang lại rất nhiều kiến thức mới. Đừng bỏ lỡ bất kỳ bài viết nào của chung tối, hãy đăng ký để nhận bài viết mới qua Mail của bạn
Đăng ký để không bỏ lỡ bài viết nào!
Bài mới
- Giáo trình Robocon
- Giới thiệu các loại board Esp8266 dành cho IoT và thiết lập cơ bản cho người mới học
- Hướng dẫn sử dụng LoraEasyV1
- Tài liệu tự học Python tiếng Việt cho người mới bắt đầu
- Tương lai của kết nối IoT (Internet of Things) tiềm năng và sự đa dạng
- HƯỚNG DẪN LẤP RÁP XE MÔ HÌNH 4 BÁNH
- HƯỚNG DẪN LẮP RÁP XE CHẠY BẰNG NĂNG LƯỢNG MẶT TRỜI
Danh mục